Chi Gun: Jan Joan position Tutorial.
Jan Joan (zhan zhuang).
The basic position for Tai Chi (Taiji) and Chi Gun (Qigong) practices.
Online tutorial covering proper way of doing the exercise.
Detailed illustrated descriptions, step by step.
Jan Joan (the tree) is the foundation of Tai Chi. All techniques originate from it, and all "rules" and "secrets" of the style, too. It is used to perform meditations. It is used to make "chi" to move around the body. It is used as a base of all fighting techniques as well.
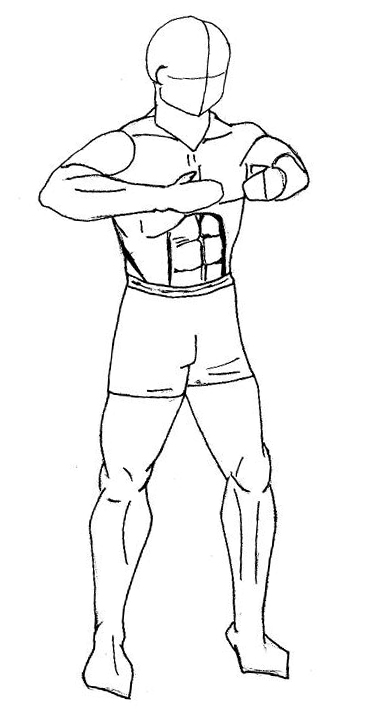
In this article I am going to describe briefly, the rules that you have to follow carefully in order to do Jan Joan correctly. You will find more details in Tai Chi and Chi Gun Home Site, just keep in mind, that everything you hind there is based on... that's right. On Jan Joan.
Two important points before we proceed.
1. Why is Jan Joan so important for Chi Gun healing practices? The answer is "because it teaches you the proper posture". See, "chi" in Chinese philosophy is a mixed metaphor for both power and liquid, something that can flow through your body... Unless that body is misaligned, in which case the flow breaks.
In more materialistic terms, you need to position and stretch your muscles and ligaments properly - and your back will stop being sore. You need to learn how to distribute your weight - and your knees will begin to heal. Do you know, by the way, that weightlifters often come to Tai Chi schools for couple of months - to "fix" their knees, before they can go back to their weights?
2. Also, I know it sounds weird, there is a large set of publications, dealing with "Tai Chi knee injuries"! How is that possible? Very simple - these people break "rules" - and get punished for that. So - read it carefully, these rules are very simple. Really.
Stay straight, feet shoulder width apart.
By shoulders I mean the centers of shoulder joints, not the outer edges of your body. That means your feet are about as wide as the length of your sole.
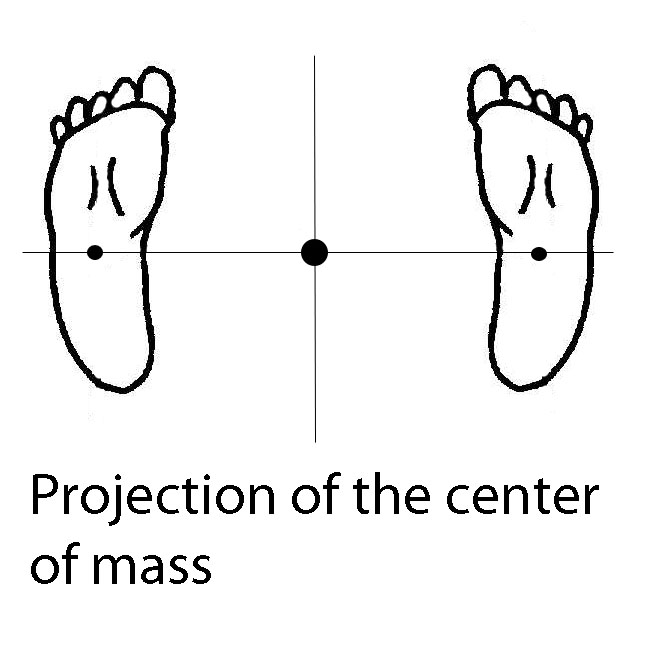
The easiest way to make sure is to draw imaginary vertical lines from centers of your shoulder joints down to the floor. These lines should go through the centers of your soles.
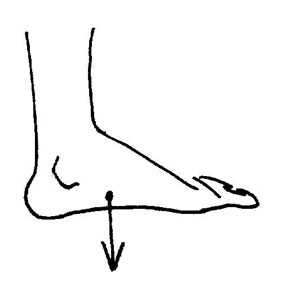
Let's compare "normal" standing position and Jan Joan.

As was already mentioned, in Jan Joan projection of your shoulders to the floor should overlap with the middle of your foot. A "normal" standing position is different - the projection usually overlaps with heels.
The reason is simple - in "normal" position knees are straight, while in Jan Joan they are slightly bent.
This is the second important checkpoint:
Knees are slightly bent
How to make sure knees are bent properly. Well... First of all, there is no STRICT requirements. Being in Jan Joan, you can bend them a bit more or a bit less. The projection of the knee should not go pass the thumb of the same foot, this is mandatory. And the knee should not be straight.
There are more differences between the "normal" position people use in everyday life and Jan Joan. Let's take a look at the waist. The point on your back, located at the level of your belt, is called "min men". "Normal" position assumes your back bone is curved forward in this point, it is called lordosis. Well, not in Jan Joan.
Weight properly distributed over your soles
As was already mentioned, the shoulder's projection should be at the middle of your sole. Feet should be parallel. Now, when you made them parallel, and your shoulders projection (meaning - your weight, by the way!) is where it should be - now apply some force, twisting your feet outside. It should not be enough to make your soles to actually slibe by the floor, but if yiu apply this force clockwise for the right foot, and counter clockwise for the left, you will notice, that the body weight shifts from "whole sole" to the outer edge of the sole. This same effort makes your knees to move slightly to the sides - to the position on top of the middle point of the sole - very convenient.

Now, let's create a small checklist. Weight at the outer edge of a sole. All fingers flat on the floor. Heel flat on the floor. And an empty space under the inner edge of your sole.
This sort of a tension allows you to switch from steady position to moving in any direction, fast. And of course, as always, Chinese "chi" metaphor teaches us, that this way "chi" can circle through your feet, focusing in Jyn Tsuan point and leaving it through the energy meridians.
Lower back flat
You need to apply some conscious effort to push your "min men" point back, to make your back flat. In old Chinese manuscripts it is often refered to as "the back of a turtle".
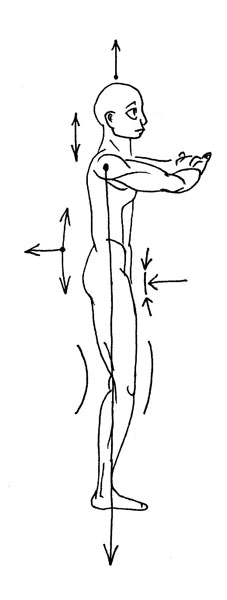
Why do you need it? From the "chi" point of view, the energy will not move, unless you have your back aligned properly. From healing point of view, it gives your back a nice stretch. And from the martial point of view... Imagine someone push you back, by applying pressure at your shoulders. If you have your back curved as in "normal" position, you will bend back. But what will happen if you have a "turtle back"? The pressure will go through the back to your legs and into your feet, which means that you are much harder to take off balance.
Chest "yin".
The concept of "yin" is an advanced one, I will talk about it in one of advanced manuals. For now, make sure it is curved IN, not out. See the picture. It is very important NOT to bend forward, your back at the chest level, should remain straight. The "curve in" is achieved by slightly moving shoulders forward.

Once again: the WRONG way to do it, is by bending your backbone, as if you are trying to look down.
Why do we need that? Think of someone pushing you back, as in the previous example. Before, we moved the waist back, to "connect" you to the Earth. Now we added one extra step - your shoulders are forward, so if someone pushes with the OVERWHELMING strength, you can move them back, which gives you some tiny fraction of a second to regroup, and perharps to turn, letting the push to pass you. Instead of taking you off balance.
There are many more reasons for assuming the "turtle back" position, once again, it will be discussed in advanced tutorials.
Groins area "yin".
This one is MECHANICALLY related to the "keep your lower back flat" rule, and after some time in Chi Gun, I can not understand how is it possible to break this rule. Nevertheless, beginners always break it.
To do it, imagine, that someone kicks you in the groins. Not kicks, but does a threatening jerking move, kind of sending you a message "I am about to kick". A natural reaction of a person - to pull groins area back. Well, remember the feeling, that's what you need. The amplitude is tiny, it is not a wide motion.
The reason for "groins yin" is same as in "lower back flat", as the mater of fact, these are two ways of describing the same thing. Also, if your groins are "yin", you can turn your hips faster. Also - if you need an "energy" explaination - the groins area are "in", as opposed to "yan", and shouldn't be curved out.
Now, let's take a look at the neck.
Neck is straight, "neck effort" is directed up
Again, same way as with the lower back, a normal neck of a normal human is curved forward. And again, we work hard to remove this curvature. Why?
Applying the same logic as before, you can guess that: a) it provides some kind of mystical "connection with the sky", that is required for "chi" to circulate, b) it provides a nice healing stretch to the neck and shoulders ligaments and c) it is required to counteract frontal punches.
All three guesses are correct. Let's say, someone punches you in the forehead. Or (see "lap sao" description at Wing Chun web site, or the "dropping chi" description at Tai Chi site) someone is pulling your hand in such a way that your head jerks, creating a dangerous tension at your neck. If you have your chin forward, chances are, your neck will break. If, on the other hand, you always keep the "neck effort", as if there is a line attached to the top of your head, that pulls your head up... Your head will not jerk, and the punch, no mater how unpleasant it is, will not kill you.
Finally, let's take a look at hands in Jan Joan.
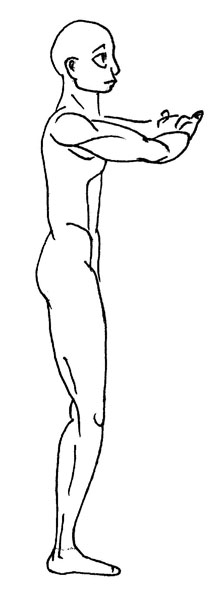
Shoulders relaxed
This is the most frequent error beginners do, and it gives them a lot of pain. Shoulders are getting tired, and sore.
Also, if the shoulder is up, your hand can not resist a frontal push, also, you can not push forward with sufficient strength.
You can make sure it is true - try to do pushups with your shoulders up. In Tai Chi terms, if the shoulder is up, it is disconnected from the body, and "chi" can not go through it. In mechanical terms, when the shoulder is up, you need shoulder muscles to push forward, and these muscles are not very strong. While, when the shoulder is down, the leverage between it and the body is very little, and you can use the strength of your LEGS to push - the strongest muscles in your body!
Of course, you need "turtle back" to make your legs connected to your upper body...
When you look at Jan Joan, you can think that muscles are used to keep hands floating at the chest level. It is not quite so.
The feeling should be, as if there is a rope (ligaments of your back actually) going from your left hand, through your back, and to the right hand. If you imagine this rope being tight, it will hold your hands up with no muscles involved. I know it is not so, from the point of view of physiology, but I also know that when I started Chi Gun, I was not able to stay in Jan Joan for longer than five minutes, while now I can do it for hours - and my muscles now are not any stronger than they were before. So, believe it or not, it is a mater of proper body alignment.
The overall feeling should be - "there is a ring, formed by your hands and your back at the chest level, and you push out with this ring". In the same time, you work on straightening your back and your neck, on keeping down your shoulders and so on.
Hands round, elbows relaxed and slightly down
You will have similar elbows position, if you sit at the desk, middle part of the forehand on the edge of a desk, hands on the keyboard.
Except, hands should be turned palms towards your chest.
Hands turned, palms towards your chest

Fingers should be apart, as if you are trying to straighten and stretch every finger. Baby fingers should be slightly closer to your chest, while thumbs - slightly further from it. This gives your forehands and palms an extra stretch.
There can be a slight bend between forehans and palm, but it should not be bery strong - the overall sensation should be "hands are round".
Hands are round
It means not too straight, and not too bent in elbows. Think of holding a ball of some kind.
Face should be relaxed
As the mater of fact, often it is recommended to have a slight smile on your face. That definitely can help you in a martial situation :)
It is very important to realize and to accept the fact, that you can not - and never will be able to - keep track of all the "checkpoints" simultaneously. It is ok. Go through the mental checklist, one time after another, this is exactly the way Tai Chi masters do it.
This is why it is called Chi Gun - the WORK of "chi".
